Sellers Handbook - How to Set Up & Run a Store
This page will guide you through chapter 8 (How to establish a product or service for sale)
Created: 2015-12-08
Updated: N/A
Author: 3Dfilamenta Marketplace
Email: [email protected]
Section
0. Introduction
1. Sign up Process/login (For those that neither have buyers or sellers account)
2. Sign up Process/login (For those that already have a buyers account but no sellers account)
3. Access Your Seller Account Page
4. Setup Your Seller Account Page
4.1 How to Receive Funds and How to Setup Payment
4.2 How to Manage Orders and Orders Status
5. Setup Shipping Carrier
6. Setup Shipping Cost based on total Weight
7. Setup Shipping Cost based on Price
8. Establish a Product or Service for Sale
8.1 Information
8.2 Images
8.3 Features
8.4 Association
8.5 Prices & Discounts
8.6 Quantity (Stock)
8.7 Combination
8.8 Virtual Product
8.9 Attachment
8. Establish a Product or Service for Sale
After have been setup your sellers account and established shipping carrier to those country you want to send to you can finally establish a product or service for sale.
OBSERVE! Establishing a virtual product or service is in general same as establishing a normal product but with the exception of not being able to use combination. You also need to establish product information in the virtual product tab.
Following information will be divided in the different sections to establish a product or service.
8.1 Information
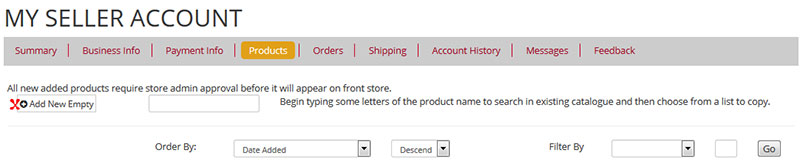
A) To establish a product or service go to your "Seller Account">>"Products" and press the “ADD NEW EMPTY” button. You will be forwarded to a new page titled INFORMATION.
OBSERVE! All new added products require store admin approval (by 3Dfilamenta staff) before it will appear on front store.
B) Fill in all the field in the page. Once all field is filled in press save to save the product.
EXPLANATION OF DIFFERENT KEYWORDS THAT APPEARS IN THIS PAGE:
NAME: Name on your product or service. Try to make the name as attractive as possible since this is the first thing buyers will associate with when buying.
CATEGORY: Select which category your product belongs to.
WHOLESALE PRICE: Set the wholesale price for your product (will only be visible for yourself). If you do not know the wholesale price simple leave the field empty.
RETAIL PRICE: The price of the product or service (excluding tax if any).
QUANTITY: How many you have in stock ready for shipment (not visible for others).
WHEN OUT OF STOCK: Indicates what will happen if stock is zero.
ADDITIONAL SHIPPING: Add extra shipping cost on this product/service, else leave it blank. For example if original shipping carrier is X and additional shipping is Y, the total cost will be X+Y.
REFERENCE: Add a reference for the product or service, will be visible for all.
EAN13 OR JAN: Input European or Japanese article number if any, will be visible for all, else leave it blank.
UPC: Input Universal Product Code if any, will be visible for all, else leave it blank.
STATUS: Enable (will be visible for all) or disable (will not visible for anyone than you, the seller) the product/service.
VISIBILITY: Choose where you want the product or service to be visible at the Marketplace.
OPTIONS: Choose options for the product or service as stated in the page.
CONDITION: Choose the condition of the product/service.
SHORT DESCRIPTION: Write some short information about the product or service. The information provided will appear in the product list and on the top of the product page.
DESCRIPTION: Write full detailed information about the product or service. Will appear in the body of the product page.
META TAGS: The information that you provide in a Meta tag is used by search engines to index a page so that someone searching for the kind of information the page contains will be able to find it. Input keywords associated to your product, for example: 3D Printer, Additive Manufacturing Machine, Direct Manufacturing Machine. Separate each keyword with comma.
You can also leave this field blank, but is not recommended.
META DESCRIBTION: Thistag serves the function to explain the contents of your product or service to search engine result pages (SERPs) to display preview snippets of your product page. It is therefore important that you write a good description with your keywords in it. Optimal length is roughly 150-160 characters.
Example of Meta description: “3D Printing Repair Service in Canada, Ontario”
META TITLE: The title of your product or service. Will appear at the top of the browser and in search engine result pages.
Example: “3D Printable iPhone Case”
FRIENDLY URL: Your product or service page can have a link with own name. Leave this field blank and it will auto generate a friendly URL based on the name of your product or service.
TAGS: This tagging feature enables you to associate your product or service with keywords. Your customers can use the keywords to easily and quickly find the products they are looking for in the search function.
For instance, let's say customer wants to find a 3D Printer in your shop. In order to find the product corresponding to his or her search, there needs to be a tag to associate "3D Printer" with for example "ULTIMAKER".
Example: 3D Printer, Ultimaker, Additive Manufacturing Machine, FDM Printer
C) Once the product or service you established have been saved you will receive a confirmation email.
D) Once saved, you will unlock some more tabs which you need to fill in order to make the product or service completed.
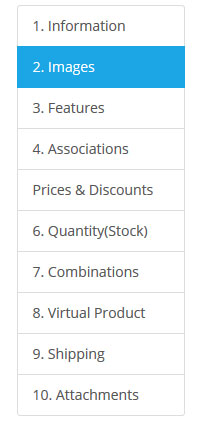
8.2 Images
Consumers visiting your store will see pictures related to your product or service. This part is where you upload pictures for your product or service and will appear at the top of the product page, on front page -and listing pages. The images will not be visible on the product page detailed information section.
Continue with uploading some images in the “IMAGES” tab. Press the browse button and select image to upload. Press the “Upload” button to begin uploading the picture.
At the same tab menu you can see the overview of all your uploaded images. These images can be deleted at place.
8.3 Features
At the "FEATURES" tab you can add some features to the products. This will appear on the product page under the data sheet tab.
Features are used to characterize products or services. A feature can be anything that gives more information and details about the product or service. For example if you sell a 3D Printer you can have features such as “height”, “width”, “size”, “built print size” and so on.
To add one or several features, simple select one of the many features available or customize your own features.
To customize your own features simple input a desired name in one of the fields and save it.
8.4 Association
At the "ASSOCIATION" tab, you can once again verify and check which category the product or service should belong to. Remember if you have assigned to a sub category you must also assigned it to the main category or it will not be displayed correctly on the Marketplace.
8.5 Prices & Discounts
- Here you can set price for your product/service including or excluding tax.
o Pre-tax wholesale price: In this section you can input the wholesale price at which you bought this product. This will only be visible for you, the seller.
o Pre-tax retail price: The price you sell it for excluding tax.
o Tax rule: Set the tax for the product/service.
-
- - No tax= No tax will be applied
- - All Country Sales Tax= Tax will be applied to all countries
- - Specific Country with tax rate=Tax will only be applied on the specific country (and state if any).
- Observe! If an EU member country is selected, the tax will appeal to all European Union countries.
You can read more about which countries that are member of EU by visiting this link: http://europa.eu/about-eu/countries/member-countries/index_en.htm
o Unit Price: is simply used to inform your customers how the product is priced. This will be displayed on the product page and will not function as some auto calculated function.
o On Sale: Tick the ”on sale" box if you want to display “on sale” on product front page. This will only be visible on front page.
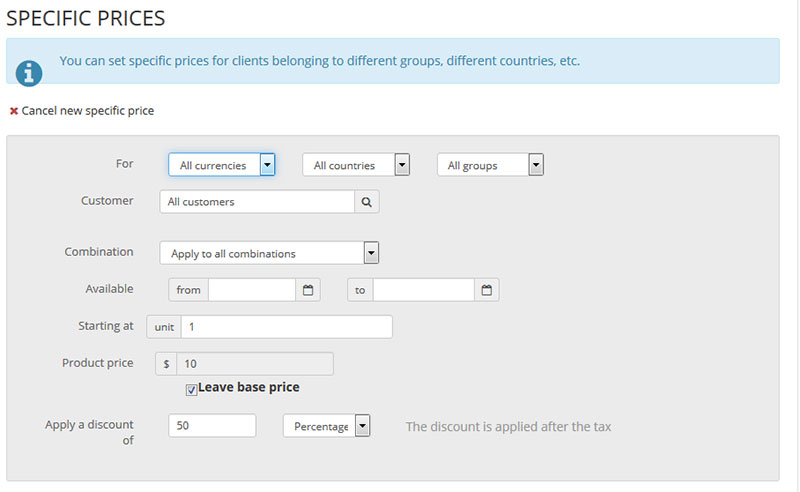
o Specific Prices: You can set specific prices or discount for buyers belonging to different groups, different countries, etc. If you need specific prices do as follow:
- - Press the “add new specific price”, then fill in all information necessary and save.
- - In the for field you can select which currency for which country and group the specific price should be valid for.
- - In the Customer field you can assign specific customer or all customer
- - Combination will let you apply the specific price on combination if any
- - The Available field let you decide how long time the specific price will be available. Leave the field blank to let it be valid forever.
- - Starting at indicates how many units should be bought before the specific price will be available.
- - Product Price indicates how much the specific price should be. Tick off the box and input your own price (for example if currency SEK are chosen in the FOR option the price will be at that currency and not the standard USD).
- - Apply a discount of give you the option to make a specific discount in amount (in the currency you have chosen for the FOR option) or percentage.
o Priority management: Sometimes one customer can fit into multiple price rules. Priorities allow you to define which rule applies to the customer. Normally this field can be ignored.
8.6 Quantity (Stock)
This section let you input the quantity and set the setting for what should happen if your product is out of stock.
Simple input the quantity in the respective product.
OBSERVE! If you have added new combinations to your product you must go back to this section and add quantity to or it or it will have default zero quantity in stock.
If product is out of stock you can choose between:
- Deny orders= Deny orders when stock is 0
- Allow orders= Allow orders even if stock is 0
- Default: Deny orders= Deny order when stock is 0
Availability settings gives you the option to customize:
- Displayed text when in-stock:
- Displayed text when back-ordering is allowed:
If you leave this field empty, Marketplace default text will appear.
8.7 Combination
OBSERVE! If you are selling a service or virtual product you cannot use combination!
When establishing a product you may want to offer the same product in different variations. For example “3D Printer with black color”, “3D Printer with yellow color” and so on. Instead of creating a separate product for each variant you can add a single product in the catalog and then add combinations using product attributes (e.g. color, machine size, heated bed type, etc.).

In this section you can add and manage the combinations of a product by editing the particular product.
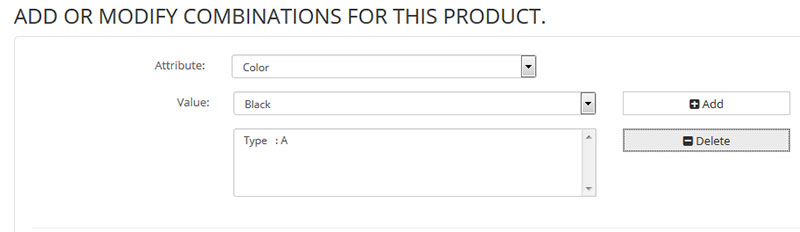
A) On the combination section, press the “NEW COMBINATION” button to proceed to add a new combination.
B) Select one attribute among the attribute group and proceed with choosing one value from the drop-down menu.
C) Press the “ADD BUTTON” to add the attribute with its value to the product or service.
D) If you want to, you can add an attribute from another attribute group to the same product/service. Just change the attribute group from the respective drop-down menu, select the value from the value menu and click on the Add button.
E) You can delete any combination with the “DELETE BUTTON” any time.
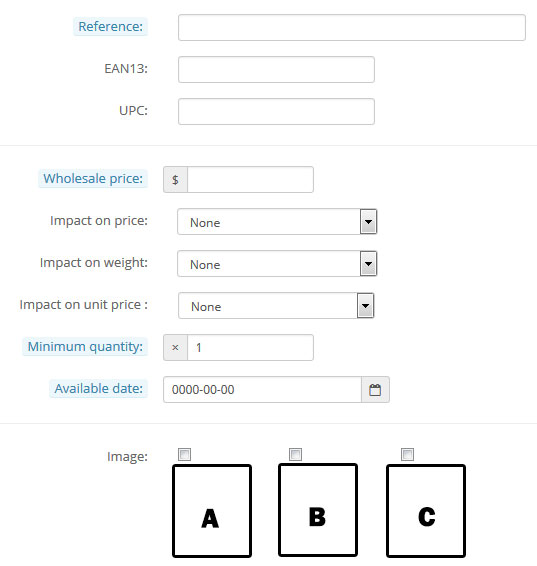
F) Input “REFERENCE” and “EAN13/UPC” if any or simple skip it.
G) In the field for “WHOLESALE PRICE” you can specify if the price of this combination is different than the one you've specified in the general options of the Info tab (the wholesale price is the price you paid for the product).
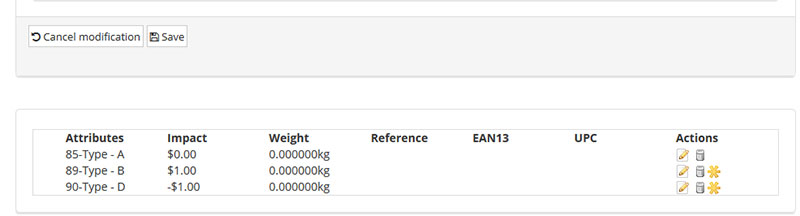
H) From the “IMPACT ON PRICE” drop-down menu you can select whether the “RETAIL PRICE” of this combination is greater or less compared to the one you've set from the general options. If the price is different and you select Increase or Reduction from the drop-down menu, a field will appear in which you can specify how much more or less the customer has to pay for this product combination.
I) From the “IMPACT ON WEIGHT” drop-down menu you can select whether the “WEIGHT” of this combination is greater or less compared to the one you've set from the general options. If the weight is different and you select Increase or Reduction from the drop-down menu, a field will appear in which you can specify how much more or less the weight is for this product combination.
J) From the “IMPACT ON UNIT PRICE” drop-down menu you can select whether the “UNIT” of this combination is greater or less compared to the one you've set from the general options. If the unit is different and you select Increase or Reduction from the drop-down menu, a field will appear in which you can specify how much more or less the price is per unit for this product combination.
K) The “MINIUM QUANTITY” field indicates how many that must be bought before the product or service can be bought. Set 1 to disable this function (default).
L) You can also set “AVAIBLE DATE”. This date decide when the product will be available. Leave this field to make it available directly.
M) At the “IMAGE” field you can set which picture should have this combination. When buyer pick the combination, only the picture related to the combination will be visible for the buyer.
N) Save the combination and you have successfully added a new combination.
At the same page you can edit or delete any combination.
Observe! It is important that you test out the combination on the live Marketplace to secure that the combination is correct.
8.8 Virtual Product & Service
If you are selling or giving away virtual product or service this is the section for you.
Virtual product or service are product that are not shipped to customers as regular products. Virtual product let your customer download the product directly from the website after checkout and service let your customer checkout without needing to select shipping carrier.
Virtual products are added and configured almost in the same way as standard products with the exception of not being able to make combination.
In order to list a virtual product or service, simple proceed as establishing a standard product with the addition on adding configuring the settings for the “VIRTUAL PRODUCT” menu.
A) Select and check the tick box “THIS IS A VIRTUAL PRODUCT”.
B) If it is downloadable select YES (e.g. software or 3D printing files) else select NO (e.g. service such as 3D freelancing).
C) Select and browse a file for upload in the “BROWSE & UPLOAD a FILE” section (must be rar or zip file). Once the file is uploaded the field “FILENAME” will automatically be named.
D) At the “ALLOWED DOWNLOADS” you can input how many times the buyer can download the file.
After the customer finished checkout they will be allowed to directly download it. With this option you can set a limit to the number of times that a customer can download the file. If you leave the field empty or you put 0 in it, there will be no limit.
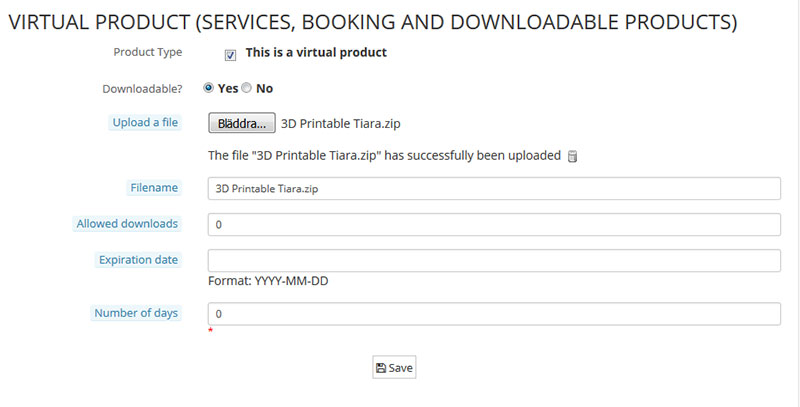
E) The “EXPIRATION DATE” let you decide if you want customers to be able to download the product only until a specified date, you can put the date in this field. After this date people will be able to order the product, but they will not be able to download the purchased product. So you have to be careful with this option. Note that if you remove the expiration date (or you extend it), people who have bought the product with the old expiration date will be able to download it. To set an expiration date just click with the left mouse button on the field and use the calendar that pops out to select the date. To disable this function simple leave the field empty.
F) After the product is ordered and paid for the customer can download the file. If you want to, you can use the “NUMBER OF DAYS” option to specify for how long the link for downloading the ordered product will be active. If the customer orders the product and doesn't download it within the specified period, they will not be allowed to download it after that. If you leave this field blank or you set it to 0, there will be no limit.
G) When you see the message -"YOURFILENAME HAS SUCESSFULLY BEEN UPLOADED” below the browse button the virtual product have been uploaded to 3Dfilamenta server. Save the section to finalize this section.
OBSERVE! If the message "YOURFILENAME HAS SUCESSFULLY BEEN UPLOADED” has NOT appeared, it simply means it has not been successfully uploaded yet.
When a customer checkout with your product and after the payment is accepted, 3Dfilamenta Marketplace will automatically send an email to the customer's email address informing them that the product can now be downloaded. The email will contain a link with which the customer can download the product.
The customer can also download the virtual product from their account settings. At the section for order history. On the page that opens the customer will see a table with all the placed orders. They have to click on the Details button for the particular order. The name of the virtual product is also a link which the customer can use to download the product.
8.9 Shipping
Over to the SHIPPING field you can set the “WEIGHT”, “WITDH”, “HEIGHT” and “DEPHT“ of the product delivery package; you can set an additional shipping fee that will be applied only to this product, regardless of the used carrier. And if you want to, you can also limit the carriers that can be used to deliver the product.
Also in this section you can input the “SHIPPING WEIGHT” for the product. This part is very important if your shipping carrier is based on weight.
For example if you set the shipping to be 5 KG, the system will check the shipping carrier you have established for the specific country for the range 5 KG and apply the specific fee for that range.
8.10 Attachment
Attachment is a feature that let you attach one or more files to any of your products. The file(s) can contain anything you want related to the product: manuals, drivers or others additional information.
If a product has file attachments, it will be shown at the bottom page of the product page. Anyone can download the attached file freely regardless of whether they order the product or not.
A) To add a file to a product or service firstly type a “FILE NAME” for the attached file. This name will be visible for all on the product page.
B) “DESCRIBTION” is short description of the attachment and is optional and will be visible on the product page for all.
C) Click on the “ADD FILE BUTTON” and use the window that pops out to select the “FILE” from your local computer. After you select the attachment file using the File option you need to press the upload button to upload the file.
D) If the uploaded file is listed in “AVAILABLE ATTACHMENTS” it won't be visible on the product's page. In this case you need to mark it and click on the Add button. This will move it to “ATTACHMENT FOR THIS PRODUCT” section indicating it will be visible for public for the product page. If you don't want the attachment to be visible on the product's page any more, mark it and click on the Remove button. The attachment will not be deleted; it will just be moved to Available attachments from where you can attach it to the product again at any time.
After you're done with the settings don't forget to click on the “SAVE” button.
If you want to delete the attachment from the server, please contact 3Dfilamenta customer service.