Sellers Handbook - How to Set Up & Run a Store
This page will guide you through chapter 5,6 and 7 (How to set up shipping carrier and shipping cost)
Created: 2015-12-08
Updated: N/A
Author: 3Dfilamenta Marketplace
Email: [email protected]
Section
0. Introduction
1. Sign up Process/login (For those that neither have buyers or sellers account)
2. Sign up Process/login (For those that already have a buyers account but no sellers account)
3. Access Your Seller Account Page
4. Setup Your Seller Account Page
4.1 How to Receive Funds and How to Setup Payment
4.2 How to Manage Orders and Orders Status
5. Setup Shipping Carrier
6. Setup Shipping Cost based on total Weight
7. Setup Shipping Cost based on Price
8. Establish a Product or Service for Sale
8.1 Information
8.2 Images
8.3 Features
8.4 Association
8.5 Prices & Discounts
8.6 Quantity (Stock)
8.7 Combination
8.8 Virtual Product
8.9 Attachment
5. Setup Shipping Carrier
This is where you select one or more shipping carriers that will be delivering the package.
In this section, we are going to create a complete shipping carrier, from A to Z. You can create as many shipping carriers as you wish.
If one carrier has different shipping services, you should create as many carriers as you need, and differentiate them with their names.
If you intend to only sell virtual files, then no shipping carrier is need. You can skip this step.
If you intend to sell product and assign a fixed shipping fee per product and quantity, then you need to assign shipping carrier and select which countries you are able to ship to. In the product shipping setting, always put weight to "0" and enter the "Additional shipping fees (for a single item)".
For example: If you enter $10 in the "Additional shipping fees (for a single item)" field then then an additional $10 will be charged for each item, regardless of how your shipping rules are set.
If you however set both weight additional shipping fee on the product, then the system will calculate the shipping fee based on your shipping carriers prices+ additional shipping fee.
If you are going to sell products based on weight or price then you need to add a shipping carrier with price and weight ranges. Following will explain this.
Before we start let us explain why shipping carrier is needed.
Firstly, when you establish a product for sale, you need to give the product some data, such as how heavy the product is and price for the product.
When a product is established you need to link it to a shipping carrier with shipping prices, and to do that you need to establish shipping carrier(s) for this. The shipping carrier will tell the consumer how much the shipping cost will be for different destinations and how long time it will take to deliver the product.
You only need to establish shipping carrier once and as many as you want.
For example: You have setup a shipping carrier with freight cost to Germany. The setting is as follow:
If product weight is 0-0.1 (0.1 excluded) KG then cost is 0 USD
If product weight is 0.1-1 (1 excluded) KG then cost is 5 USD
If product weight is 1-5 KG (5 excluded) KG then cost is 10 USD
The product has shipping weight: 2 KG
Based on this fact, a customer from Germany needs to pay 10 USD in shipping cost.
EXPLANATION OF DIFFERENT KEYWORDS THAT APPEARS IN THIS PAGE:
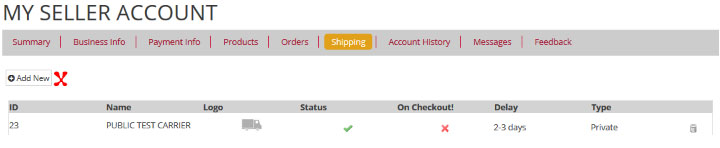
NAME: Name of the carrier, you can name it as you want for example “INTERNATIONAL CARRIER”
LOGO: The picture of your shipping carrier, you can upload your own.
STATUS: “X” means the carrier is not in use and will not be visible for anyone but you. If the sign “√” appears it means the carrier is visible for all and in use in real-time.
FREE SHIPPING: If you have selected this carrier to have free shipping then, the “√” will appear.
DELAY: This section tells you how long time it will take to ship the item, for example 3-5 working days.
TYPE: If the sign says “PUBLIC” it means every seller at the marketplace can see and use this carrier if the status is online. Only 3Dfilamenta Admin can give “PUBLIC” status.
If a seller make a shipping carrier it will be labeled as “PRIVATE” status and only you as the seller can use that shipping carrier for your store. The carrier will not be visible for others sellers.
Now let us start establish a shipping carrier.
A) At your seller account, select shipping, then “ADD NEW”. You will reach a new page. Fill in the data that is needed.
EXPLANATION OF DIFFERENT KEYWORDS THAT APPEARS IN THIS PAGE:
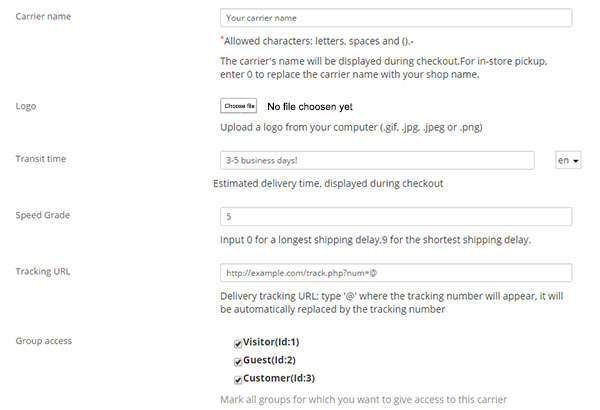
CARRIER NAME: Choose name for your carrier. For example. “EUROPE”, “INTERNATIONAL SHIPPING”, “DHL”, “FedEx” and so on. Buyers will see this name and associate it with your carrier.
LOGO: Having a logo willhelp your customer to identify the shipping carrier easier. The logo will be auto resized in order to fit in the order form. Recommend is logo no bigger than 150x150px.
The logo will appear in each panel of the shipping section of the checkout process.
TRANSIT TIME: The estimated time it takes for this carrier to deliver your products. This field can contain any text and numbers. This is displayed to customers during checkout. It will help them select their carrier according to the amount of time they are willing to wait to receive their shipment.
SPEED GRADE: This field can only contain numbers 0-9. From 0 (very slow) to 9 (very fast). This is then used to sort carriers by their speed grade, and help customers choose the one they prefer.
TRACKING URL: This field needs to be filled with the tracking URL provided by your carrier (if there exists one). For example if you send your packages with DHL, DHL offers this URL: http://http://www.dhl.com/en/express/tracking.html?AWB=@. When customers finish their purchase, they will receive that URL with the "@" replaced by the tracking number provided by the carrier, making it possible to click that link and see where the delivery process is at.
Once you shipped a package you can at the order tab for the specific order input the tracking number.
GROUP ACCESS: You might want only some user groups to be able to use a carrier. This option serves this purpose.
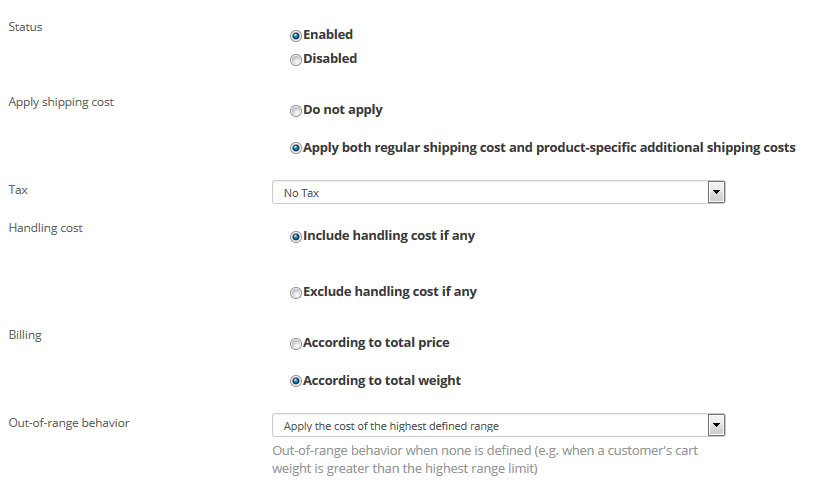
STATUS: Let you disable or enable the carrier
APPLY SHIPPING COST: Choose if your carrier will have shipping cost or not. If you intend to setup shipping cost for the carrier you should apply shipping cost (this option apply basic shipping fees along with specific per-product fees).
If you intend to make this carrier have no shipping cost, please choose “DO NOT APPLY”.
TAX: Indicates if the carrier requires a local tax or not in order to deliver. Different taxes already exist, choose an exist one or choose not to apply tax on prices for the shipping carrier.
HANDLING COST: Choose if handling cost should be included or not. At current moment this function is not available hence choosing include or exclude will gain the same result. Handling cost will always be 0.
BILLING: Choose whether you want to calculate the shipping costs by total price or total weight.
OUT OF RANGE BEHAVIOUR: In case the chosen carrier has not set shipping cost for the required zone or weight, you can indicate how the Marketplace should react. You have two options:
- Apply the cost of the highest defined range. The Marketplace will take the most costly range and apply its conditions.
- Disable carrier. The Marketplace will not suggest this carrier, since it probably cannot deliver this order.
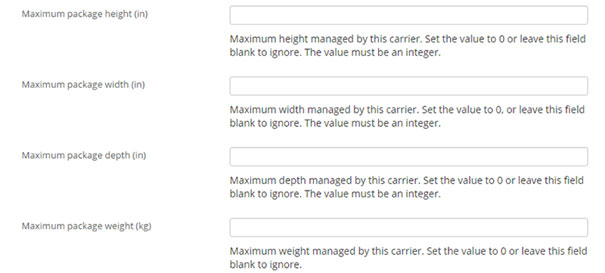
MAXIMUM PACKAGE HEIGHT/ WIDTH/DEPTH/ WEIGHT: You can set the carrier to only accept product with maximum limit. If one of your product is above the maximum value “OUT OF RANGE BEHAVIOUR” will occur. (When you establish a product you can input package measurement which will be linked to the carrier.)
Recommended is to leave this field blank to ignore it if you are not an advance user.

Countries: Here you assign which country or countries this carrier ships to. If you want this carrier to only appear for European countries you need to check all European countries.
Once finished filling in all necessary fields, press the “SAVE & PRICE SETTING” to continue to set the price for the carrier you just established. You will reach a new page where you can set the prices.
6. Setup Shipping Cost based on total Weight
If you have chosen the shipping carrier to bill according to “TOTAL WEIGHT” you need to setup some weight ranges and cost. If you have chosen to bill according to “TOTAL PRICE” please go to section 7.
EXPLANATION OF DIFFERENT KEYWORDS THAT APPEARS IN THIS PAGE:
RANGE: Set the desired range for each country. The ranges are based either on the weight or on the price of the order.
Carrier Regions: The country or countries you have selected for this carrier is visible here.
All Countries: Fill in a cost for this field if you want all countries in the specific range to have the same cost. If you input for example 10, then all the countries in the range will be auto-filled with the same amount.
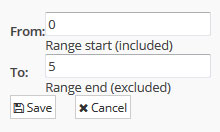
From: This is where the range should start and will be included in the range calculation
To: This is where the range should end but will not be included in the range calculation
Let start with setup the ranges followed with shipping cost.
A) Press the “ADD RANGE” button, a popup box will appear. In the box you can input the ranges you want. You can add as many ranges as you want. The range is important as it will reflect the shipping cost you set.
To add another range click on the Add new range button and configure the options that appear.
Example weight ranges:
0 to 0.1 (KG)
0.1 to 1 (KG)
1 to 2 (KG)
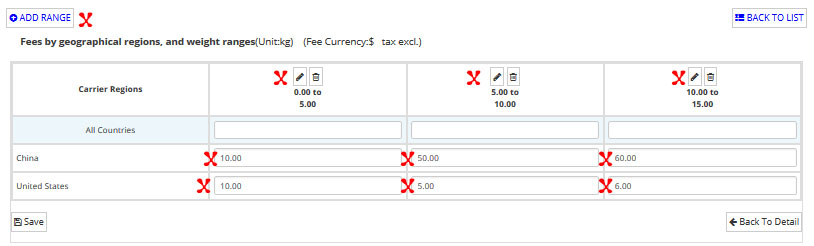
B) When all ranges are established you need to set the cost for each country and range in the correct field. You can set a different fee for the same country for each of the enabled ranges.
Example weight ranges with value for each country (in this case we have selected China and USA to have the same shipping cost):
0 to 0.1 (KG) has the fixed value of 0 (USD) for China & USA, resulting in free shipping
0.1 to 1 (KG) has the fixed value of 5 (USD) for China & USA resulting in a cost of 5 (USD)
1 to 2 (KG) has the fixed value of 10 (USD) for China & USA resulting in a cost of 10 (USD)
OBSERVE! If a country is not enabled for the particular carrier and the address of a customer is in that country, then the carrier will not be available on the page on which the customer can select the carrier that they want to use. If you have not enabled the specific country for any carrier, customer won’t be available to checkout.
C) Remember to press “SAVE” when finished adding all data.
(It is advisable to save every now and then if you are establishing data for 200+ countries in case something goes wrong)
D) When shipping carrier is saved and finished to be used you simple just need to go the product you want to sell and assign a weight to it.
More about establishing a product can be seen in the later chapter.
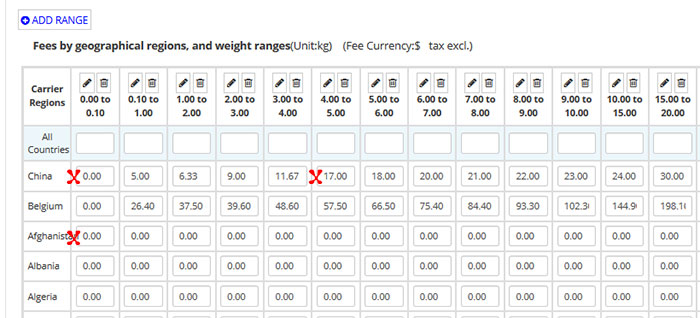
Picture above illustrates a screenshot for a shipping carrier with ranges from 0 up to 20 for 5 countries.
1. As seen, for China it has shipping fee for all ranges except 0 to 0.10 which indicates a fee of 0 (free shipping). If you input a product to have the weight 0 then free shipping will be applied.
2. If a buyer comes from China and buy a product which you have set to be 4 (KG) then the fee is 17 (USD) (Range is 4 included to 5 excluded)
3. If a buyer comes from Afghanistan, Albania or Algeria in this case, the shipping fee will be 0 no matter what shipping weight you apply on the product.
4. If a buyer comes from Germany the buyer will get denied to buy since there is no carrier with Germany included.
5. If a buyer from China buy a product with the weight 25 KG the “OUT OF RANGE BEHAVIOUR” will override all functions, which means it will either apply the cost of the highest defined range or disable the carrier (according to your setting in the carrier you have set).
6. NOTE: The carrier you establish will be visible for customer once they checkout. Whether a carrier is available for an order is determined by several things:
6.1 The address of the customer - whether the carrier is configured to deliver orders to the country
6.2 The price/weight ranges of the carrier - if the order falls outside these ranges (e.g. it's heavier than the maximum weight the carrier can deliver), and the carrier is configured to be disabled in such a case, it will not be available.
6.3 The shipping options of the products in the order - the order might contain a product(s) which is specifically configured not to be delivered with a particular carrier.
6.4 The customer group to which the customer belongs - the customer might be in customer group which is not allowed to use a specific carrier.
7. Setup Shipping Cost based on Price
If you have chosen the shipping carrier to bill according to “TOTAL PRICE” you need to setup some price ranges and cost. If you have chosen to bill according to “TOTAL WEIGHT” please go to section 6.
EXPLANATION OF DIFFERENT KEYWORDS THAT APPEARS IN THIS PAGE:
RANGE: Set the desired range for each country.
Carrier Regions: The country or countries you have selected for this carrier is visible here.
All Countries: Fill in a cost for this field if you want all countries in the specific range to have the same cost. If you input for example 10, then all the countries in the range will be auto-filled with the same amount.
From: This is where the range should start and will be included in the range calculation
To: This is where the range should end but will not be included in the range calculation
A) Press the “ADD RANGE” button, a popup box will appear. In the box you should input the ranges you want. You can add as many ranges as you want. The range is important as it will reflect the shipping cost you set.
To add another range click on the Add new range button and configure the options that appear.
Example price ranges:
0 to 0.1 (USD)
0.1 to 50 (USD)
50 to 200 (USD)
B) When all ranges are established you need to set the cost for each country and range in the correct field. You can set a different fee for the same country for each of the enabled ranges.
Example price ranges with value for each country (in this case we have selected China and USA to have the same shipping cost):
0 to 0.1 (USD) has the fixed value of 0 (USD) for China & USA, resulting in free shipping
0.1 to 50 (USD) has the fixed value of 5 (USD) for China & USA resulting in a cost of 5 (USD)
50 to 200 (USD) has the fixed value of 10 (USD) for China & USA resulting in a cost of 10 (USD)
OBSERVE! If a country is not enabled for the particular carrier and the address of a customer is in that country, then the carrier will not be available on the page on which the customer can select the carrier that they want to use. If you have not enabled the specific country for any carrier, customer won’t be available to checkout.
C) Remember to press “SAVE” when finished adding all data.
(It is advisable to save every now and then if you are establishing data for 200+ countries in case something goes wrong).
D) When shipping carrier is saved and finished to be used you simple just need to go the product you want to sell and assign a price to it.
More about establishing a product can be seen in the later chapter.
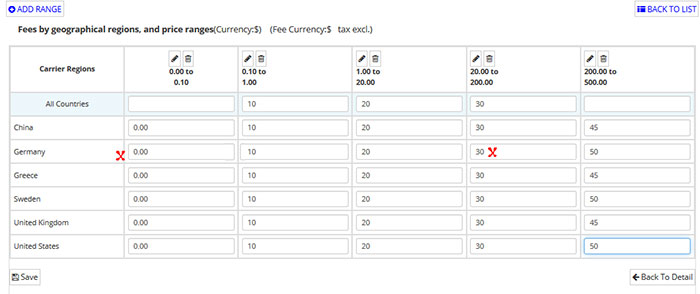
Picture above illustrates a screenshot for a shipping carrier with ranges from 0 up to 200 for 6 countries.
1. As seen, for Germany it has shipping fee for all ranges except 0 to 0.10 which indicates a fee of 0 (free shipping). If you input a product to have the price 0 then free shipping will be applied.
2. If a buyer comes from Germany and buy a product which you have set to be 20 (USD) then the fee is 30 (USD) (Range is 20 included to 200 excluded)
3. If a buyer comes from France the buyer will get denied to buy since t is no carrier with France included.
4. If a buyer from Germany buy a product with the cost 300 (USD) the “OUT OF RANGE BEHAVIOUR” will override all functions, which means it will either apply the cost of the highest defined range or disable the carrier (according to your setting in the carrier you have set).
5. NOTE: The carrier you establish will be visible for customer once they checkout. Whether a carrier is available for an order is determined by several things:
5.1 The address of the customer - whether the carrier is configured to deliver orders to the country.
5.2 The price/weight ranges of the carrier - if the order falls outside these ranges (e.g. it's heavier than the maximum weight the carrier can deliver), and the carrier is configured to be disabled in such a case, it will not be available.
5.3 The shipping options of the products in the order - the order might contain a product(s) which is specifically configured not to be delivered with a particular carrier.
5.4 The customer group to which the customer belongs - the customer might be in customer group which is not allowed to use a specific carrier.
Handpicked links
- Non Gamstop Casinos UK
- Casinos Not On Gamstop
- Casinos Not On Gamstop
- Casinos Not On Gamstop
- Best Betting Apps
- UK Casino Sites Not On Gamstop
- UK Online Casinos Not On Gamstop
- Online Casinos Not On Gamstop
- オンラインカジノ サイト
- Non Gamstop Casinos
- Sites Not On Gamstop
- UK Casino Not On Gamstop
- オンラインカジノ サイト
- сasinos Without Gamstop
- Best Casino Sites Not On Gamstop 2025
- Non Gamstop Casinos
- Non Gamstop Casino Sites UK
- Casinos En Ligne
- Online Casinos Nederland
- Best Non Gamstop Casino
- Betting Sites UK
- Casino Not On Gamstop
- I Migliori Casino Non Aams
- Casino Non Aams Italia
- Meilleurs Casino Crypto
- Migliori Casino Online
- Casino Mobile
- Casino Non Aams
- Paris Sportif Tennis
- Scommesse Crypto
- Casino En Ligne Français
- Casino En Ligne France
- Casino En Ligne Retrait Immediat
- Site Casino En Ligne
- Free Spin Bonus Senza Deposito Immediato
- Migliori Siti Casino Non Aams
- Siti Non Aams
- Casino En Ligne
- Casino En Ligne France Fiable
- Online Casino Sites Malaysia
- Lista Casino Non Aams
- Nuovi Casino Online Italia
- Migliori Siti Per Poker Online
- Migliori Siti Poker Online
- Siti Non AAMS
- Casino En Ligne